FIRST-TIME SETUP / TWO SEPARATE ROUTES
From your disc
to your browser.
Start with direct emulation if you want to try a game without a terminal. Choose recompilation if you want to build a game locally. Neither route guarantees that every PS2 game will work.
ROUTE 01 / PLAY!.JS
Play ISO Directly (Experimental)
Play!.js is a separate browser emulator. It accepts ISO, CSO, CHD, ISZ, BIN and ELF files without a compiled build or BIOS file. Its compatibility is independent of PS2 Web Recomp.
Open the player.
Go to direct play and choose Open Play!.js here in a current desktop Chrome or Edge. Alternatively, use the official player in a new tab, including in Firefox.
Select your game inside Play!.js.
Wait for the player’s file chooser, then select your local game file. The main site’s “Choose build files” button belongs to the other route and is not needed here.
Focus the game and use its controls.
Click the game screen; follow the control table inside Play!.js. If it stays blank, try the official new-tab link. An unsupported game may still fail. Embedded storage is temporary: closing, switching or reloading can lose progress.
File types and limitations: official Play!.js page.
ROUTE 02 / PS2 WEB RECOMP
Recompile a PS2 Game (Advanced)
This route translates a game’s executable ahead of time and builds WebAssembly on your computer. The website only generates commands and loads your files; it does not compile your ISO online.
- Prepare your own uncompressed .iso. This site’s helper does not accept CHD, CSO, ZIP or 7z. Renaming a file to .iso does not convert it.
- Keep free disk space for the ISO, toolchain, downloaded dependencies and generated builds. The first run needs Internet access; build time depends on your game and computer.
- Check the launcher’s Browser check before building. Required checks must pass. WebGPU is strongly recommended for 3D; the software renderer can be very slow.
Environment reference: upstream README at the helper’s pinned revision. Instructions reviewed October 18, 2026.
WINDOWS / WSL2 + UBUNTU
Build in Ubuntu. Play in your Windows browser.
Reference route · Not tested here · Not listed as tested upstream
Install and check WSL2.
On Windows 11 or Windows 10 version 2004+ (build 19041+), open PowerShell as administrator and run:
wsl --install -d UbuntuRestart if requested. Open Ubuntu from Start and create its Linux username and password. Back in PowerShell, verify that Ubuntu shows VERSION 2:
wsl --list --verboseIf it shows 1, run
wsl --set-version Ubuntu 2with the exact distribution name from that list. For installation or virtualization errors, follow Microsoft’s WSL instructions.Install the build tools inside Ubuntu.
Run the following in the Ubuntu terminal, not PowerShell. Keep all remaining build commands in Ubuntu.
sudo apt update
sudo apt install git curl cmake ninja-build build-essential clang python3 p7zip-full
bash --version
clang++ --version
Both version commands should print a version. Bash must be version 4 or newer.
Locate the ISO and download the helper.
For example,
C:\Games\My Game.isois/mnt/c/Games/My Game.isoinside Ubuntu. Replace the example with your actual path; keep the quotes.ls -lh '/mnt/c/Games/My Game.iso' mkdir -p "$HOME/ps2-web-recomp-tools" cd "$HOME/ps2-web-recomp-tools" curl -fLO 'https://ps2webrecomp.com/downloads/compile-game.sh'The first command must show your ISO. The helper downloads the engine project automatically when run in the next step; no separate Git clone is needed.
Compile in Ubuntu.
Use a new build name such as
mygame. This is a local build, not an upload.bash ./compile-game.sh mygame '/mnt/c/Games/My Game.iso'Wait for Build complete. If the process fails, use troubleshooting before retrying. WSL2’s native dependency and GPU behavior may differ from native Linux.
Open the output in Windows.
In Ubuntu, replace
mygameif you used another build name:cd "$HOME/.local/share/ps2-web-recomp/upstream/build/web-mygame" explorer.exe .File Explorer should show
ps2web.html,ps2web.js,ps2web.wasmandps2web.data. Copy the folder’s address for the browser file chooser, then follow the illustrated loading steps in your Windows browser, selecting the original ISO.
MACOS / APPLE SILICON
Prepare a modern Bash on your Mac.
Upstream reports Apple silicon builds · No local game-build verification here · Intel Macs not covered
Install Apple’s developer tools and Homebrew.
Open Terminal, run the command below and finish the installer. If it says the tools are already installed, continue.
xcode-select --installInstall Homebrew using its official instructions, including the shell setup shown at the end. Confirm that
brew --versionworks in a new Terminal window.Install and verify the dependencies.
brew install git bash cmake ninja python sevenzip
"$(brew --prefix)/bin/bash" --version
clang++ --version
Use Homebrew’s Bash 4+ for the helper. The system’s older Bash may reject syntax used by the build scripts.
Locate the ISO and download the helper.
Replace
yournameand the game filename with your real absolute path. The first command should show your ISO.ls -lh '/Users/yourname/Games/My Game.iso' mkdir -p "$HOME/ps2-web-recomp-tools" cd "$HOME/ps2-web-recomp-tools" curl -fLO 'https://ps2webrecomp.com/downloads/compile-game.sh'The helper downloads the engine project on its first run.
Compile with Homebrew’s Bash.
Use an unused build name and the same absolute ISO path:
"$(brew --prefix)/bin/bash" ./compile-game.sh mygame '/Users/yourname/Games/My Game.iso'Keep Terminal open until Build complete appears. The helper sets the modern Bash on the path for child build scripts too.
Find your build in Finder.
open "$HOME/.local/share/ps2-web-recomp/upstream/build/web-mygame"In the browser’s file chooser, press ⌘ + Shift + G to enter that folder (starting with
~/.local/share/), then follow the illustrated loading steps. Adjustweb-mygameif you chose another name.
LINUX / X86-64
Build from a Linux terminal.
Upstream reports Linux x86-64 runs · No local game-build verification here
Install the dependencies.
These package commands are for Ubuntu / Debian. Other distributions need equivalent packages from their own package manager.
sudo apt update
sudo apt install git curl cmake ninja-build build-essential clang python3 p7zip-full
Check the tools and ISO path.
Bash must be version 4+. Use a recent compiler with C++20 support. Replace the example ISO path with your own.
bash --version
clang++ --version
cmake --version
ninja --version
python3 --version
ls -lh '/home/yourname/Games/My Game.iso'
Each tool should print its version, and the last command should list the ISO.
Download the helper.
mkdir -p "$HOME/ps2-web-recomp-tools"
cd "$HOME/ps2-web-recomp-tools"
curl -fLO 'https://ps2webrecomp.com/downloads/compile-game.sh'
The helper retrieves the pinned engine project on its first run, so you do not need to clone it separately.
Compile your game.
Use an unused build name and replace the path:
bash ./compile-game.sh mygame '/home/yourname/Games/My Game.iso'Wait for Build complete before loading any output. A successful build does not establish game compatibility.
Locate the output and load it.
ls "$HOME/.local/share/ps2-web-recomp/upstream/build/web-mygame"Expect the four
ps2web.*files below. The.localdirectory is hidden; show hidden files or paste the path into your browser’s file chooser. Continue with the illustrated loading steps. Check WebGPU availability in your Linux browser before expecting playable 3D performance.
THE SAME HELPER / CUSTOM COMMANDS
Prefer commands filled in for you?
After installing your OS dependencies, open the command generator. Enter a unique build name, your absolute ISO path and your operating system, then select Copy commands. Run them in Ubuntu for WSL2, or Terminal for macOS / Linux. This is an alternative to the download and compile commands above; do not run both with the same build name.
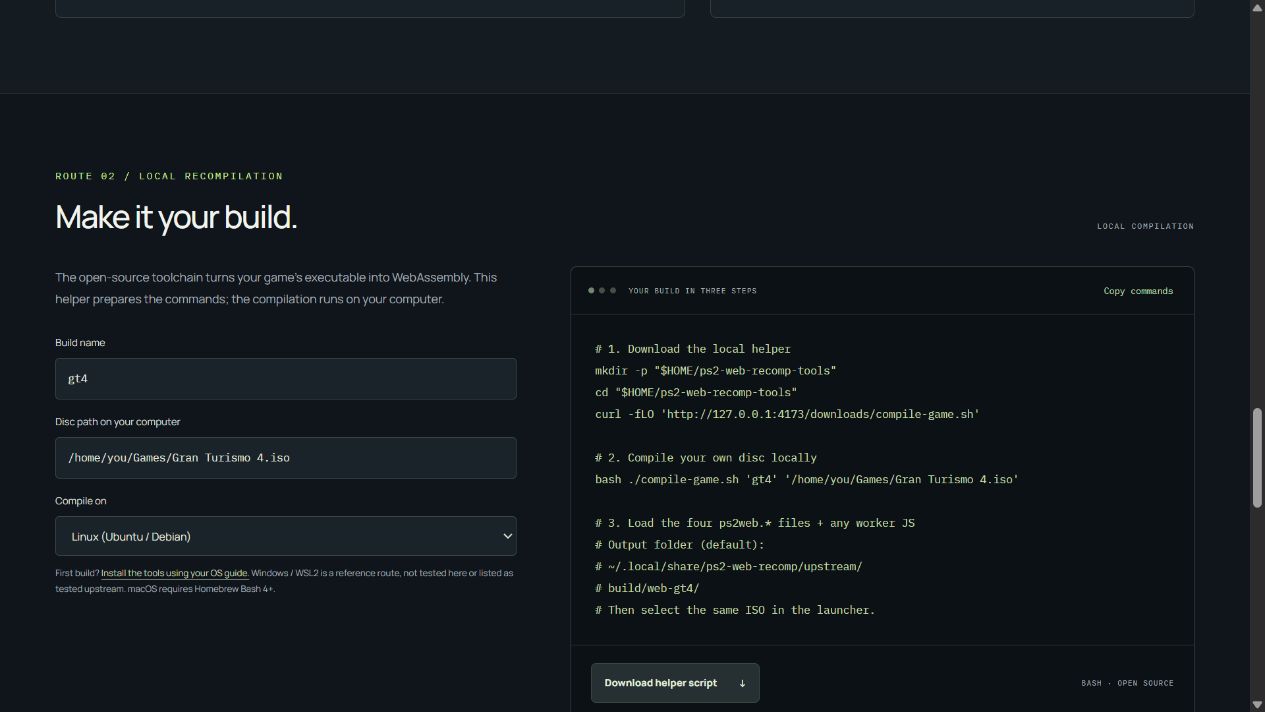
The helper clones revision f3a550b797de04b6380394e52532c03902bb03c4 into ~/.local/share/ps2-web-recomp/upstream. The first build also downloads its toolchain dependencies. Keep the terminal open through extraction, translation, exploration and the final build; activity during exploration is not the completion message.
With the default workspace and build name mygame, the result is:
~/.local/share/ps2-web-recomp/upstream/build/web-mygame/
  ps2web.html
  ps2web.js
  ps2web.wasm
  ps2web.data
  [any additional generated worker JavaScript files]
ALL THREE SYSTEMS / FINAL STEPS
Load the build and the matching disc.
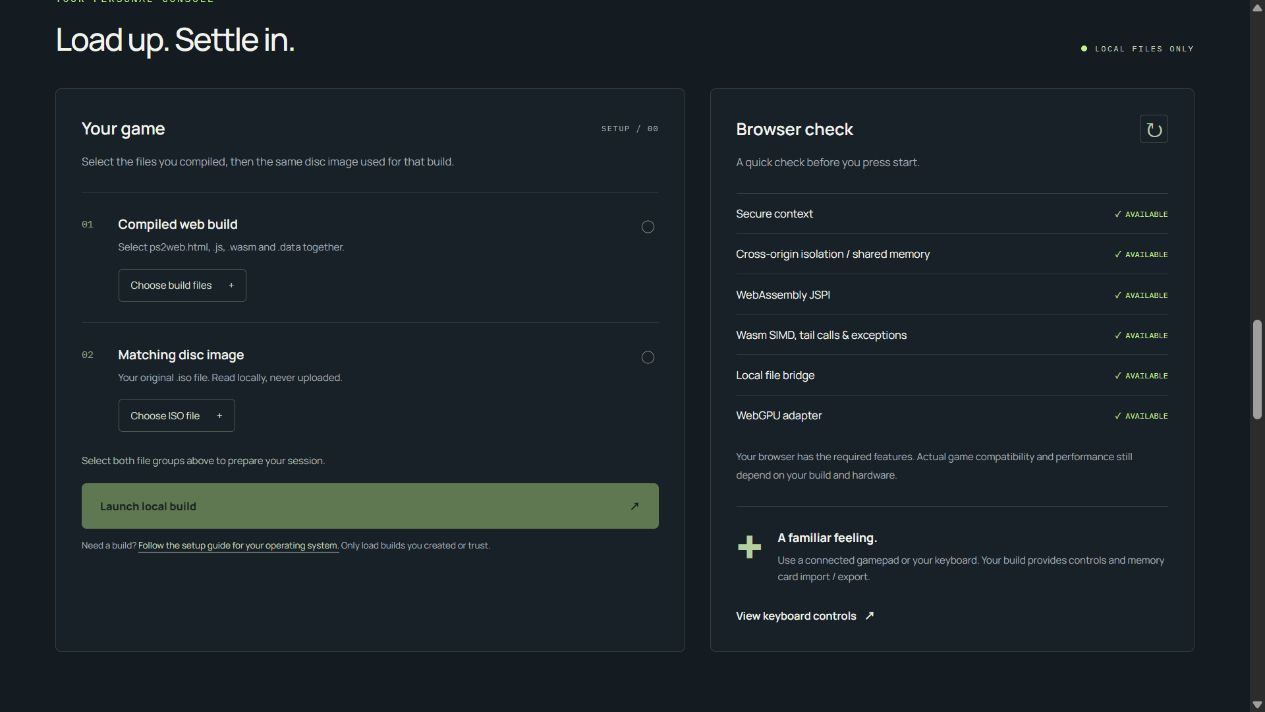
Select the complete web build.
Open the local build launcher. Choose Choose build files and select
ps2web.html,ps2web.js,ps2web.wasm,ps2web.dataand any extra generated worker JS files together from the samebuild/web-mygamefolder. Use Ctrl-click on Windows / Linux or Command-click on macOS. Do not select source templates or double-click the HTML to launch it.Select the exact ISO used for compilation.
Choose Choose ISO file. Do not mix builds with another region or revision of a game. The site checks the disc structure but cannot prove that your build and ISO match.
Check, launch and press Start.
Resolve any missing required feature in Browser check. Choose Launch local build, then use the embedded build’s Start button. Click inside the game to focus controls. See the keyboard reference or use a gamepad supported by your build.
Back up saves before leaving.
Use the build’s Export card button to download a memory card backup. Import card restores one. Keep this page open during play; reloading requires selecting the build and ISO again. Only import builds you created or trust.
WHEN SOMETHING STOPS
Find the step that failed.
For player loading, browser checks and local file errors, use the dedicated troubleshooting guide. Check game compatibility evidence separately.
“Missing dependency”, “command not found” or C++ errors+
Run the dependency installation in your OS section, then check the named tool with --version. On Windows, run Linux commands inside Ubuntu. On macOS, finish the Command Line Tools and Homebrew shell setup first. An older compiler may lack C++20 support; inspect the first compiler error before retrying.
“Use Bash 4 or newer” or “bad substitution” on macOS+
Run brew install bash, then invoke the helper with "$(brew --prefix)/bin/bash" as shown above. Do not use sh compile-game.sh or macOS’s system Bash.
“Disc not found”, missing BOOT2 or invalid ISO header+
Use ls -lh 'your actual path' in the same terminal. Keep quotes around spaces. In WSL2, use /mnt/c/ for the Windows C: drive. The generator converts Windows drive paths for WSL2. Check that this is a complete, uncompressed PS2 ISO; renaming an archive or CHD does not convert it. Use the original matching disc when loading.
“A build named … already exists” after a failed attempt+
The helper preserves existing output, including incomplete builds. Choose a new name, such as mygame-retry, and use its corresponding web-mygame-retry output folder. Do not combine files from different attempts.
“Existing upstream checkout differs” or a workspace conflict+
The helper will not overwrite another checkout. In your build terminal, set export PS2_RECOMP_WORKDIR="$HOME/ps2-web-recomp-retry" to a new, unused directory, then rerun your compile command. Output will now be under $PS2_RECOMP_WORKDIR/upstream/build/web-<name>, instead of the default path shown above.
A download fails, the build stops, or there is no “Build complete”+
Keep the terminal’s first error. Check free disk space and access to the download host named in the error. A failed Git, SDK or native dependency download is not a completed build. Correct that cause first; if the helper reports an existing build or checkout on retry, use the remedies above. Do not load empty or partially generated files.
“Missing: ps2web…” or “not a valid WebAssembly file”+
Wait for the helper’s completion message and select the four generated files together, plus extra worker JS files. Use build/web-<name>, not the source web/ folder or native build folder. If a file is empty or invalid, resolve the build failure first.
Launch is disabled, JSPI is missing, or shared memory is unavailable+
Read the Browser check beside the launcher and use a current desktop Chrome or Edge. Load the launcher through this HTTPS site, not a downloaded HTML file. Shared memory needs the site’s isolation headers. Browser capability failures are separate from game compatibility; rebuilding the ISO will not add a missing browser feature.
No WebGPU adapter, slow 3D, or a blank game after launch+
Check browser hardware acceleration, OS graphics drivers and WebGPU availability. Software rendering can be too slow for 3D. If required checks pass, confirm the exact ISO/build pairing and try the build’s native resolution. A valid build can still hit unsupported engine behavior. Logs such as [sys] unhandled syscall or [iop] missing may need an upstream implementation; reinstalling the tools will not fix them.
Where are the build logs?+
Under the helper’s upstream directory, inspect games/<name>/explore.log for exploration failures and build/native-<name>/ninja.log for native build failures, if those stages ran. Preserve the terminal’s final error too. Include the revision, OS, build name and error when investigating; do not publish your ISO or generated game files.